Whenever I have a question at work, the first place I go is Slack. There, I can ask my question (no matter how simple) and be assured that someone from my team will get back to me soon. But then two weeks later, I might have the same question, and forget that I asked it the first time. So I ask again, and get an answer again, only to repeat the same process the next month. After a while, you could build an FAQ page out of just my messages, and it would have been so much easier if we had just done that from the beginning.
If your team answers questions in Slack, don’t wait for the repeat questions to pile up. Using a Zap—our name for Zapier’s automated workflows—you can quickly add messages to documents in software like Google Docs, Evernote, or OneNote, where they can be turned into documentation you and your team can refer back to.
I’m going to show you two ways to create documentation from Slack:
-
Create an ongoing internal FAQ so you and your team have an easy-to-reference list of questions and great answers you can refer back to as needed.
-
Create a new document every time you identify something that should be turned into a permanent addition to your help site.
Create an internal FAQ
To get a head start, click the Use this Zap button below to use our template. You’ll need to create a Zapier account if you haven’t already.
Here’s how to set it up:
-
Create a blank document or note to keep track of your questions.
-
Connect Zapier with your Slack workspace and set up your trigger.
-
Connect Zapier with your documentation account. (We’re going to use Google Docs for our example, but the same steps will work with any note-taking program on Zapier, so long as it has the “append text” action.)
-
Test your Zap and turn it on.
Zapier is a tool that helps you automate tasks between web apps. Our automatic workflows—which we call Zaps—send information from one app to another so you can stop worrying about copying and pasting and focus on more meaningful work. Check out this Zapier demo to learn more about how it works.
Before you begin
To start creating an FAQ from Slack messages, you’ll want to start with a blank document. Here’s what ours looks like.

Give the document a title that’s easy to remember (because you’ll need it in a couple of steps!) and leave the page blank for now.
Connect Zapier to Slack
Head into your Zapier account.
In the Zap editor, the first step you’ll set up is the “trigger,” which receives information from Slack and sends it to the action that we’ll work on later. When you’re asked to connect your Slack account, you can either select an account you’ve previously used with Zapier, or click Connect a new account and sign into Slack in the pop-up that appears.
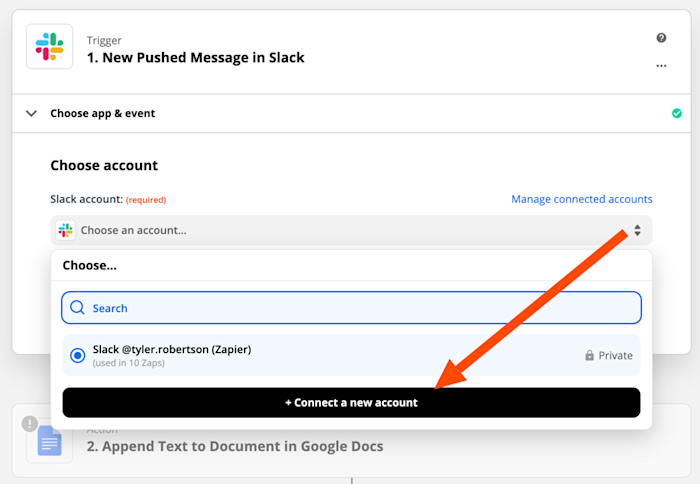
If you’ve never used Zapier with Slack before, you’ll be prompted to authorize Zapier’s access to your Slack workspace. This requires having either “owner” or “admin” permissions in Slack, and will add Zapier to the list of apps installed on your workspace.
For each app you connect, Zapier will ask for a general set of permissions which allows you to be flexible with your Zaps. The only actions Zapier takes on your app accounts are those a given Zap needs to accomplish what you’ve set up.
Once connected, select Test trigger, and a set of default sample data should appear. That means it’s working!
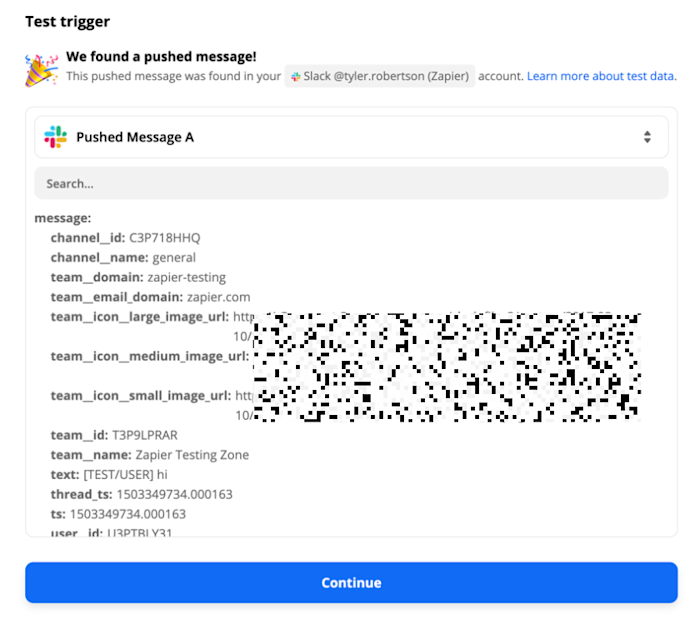
Connect to your document program
With the sample data from your trigger in hand, head to the action step and either select or connect your account. Remember: We’re using Google Docs in our example, but you can choose whatever program your team relies on for this. The steps should be nearly identical.
After connecting your account, you’ll be prompted to select the document that you would like to append messages to.
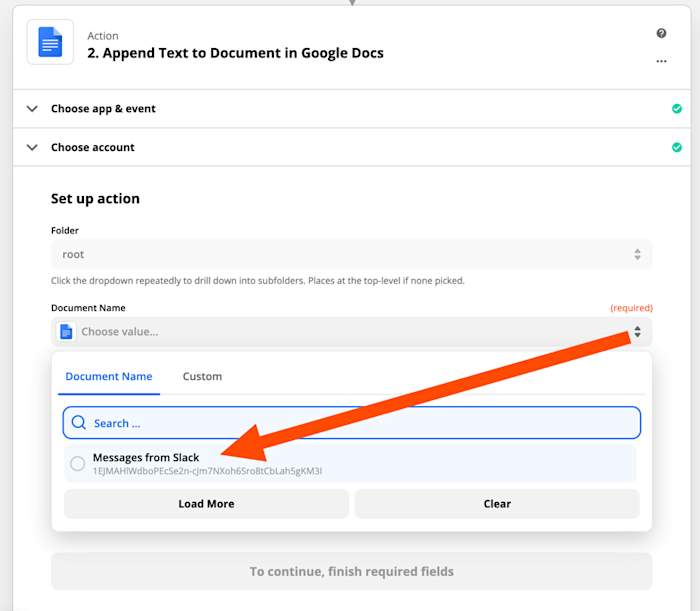
Then, fill in the Text to Append field with anything that you want to save from Slack. The template will come pre-filled with a few values, such as the name of the person who posted the message, the message text, and its timestamp. I also like selecting the Text added value, which lets us add more text when we trigger the Zap later on.
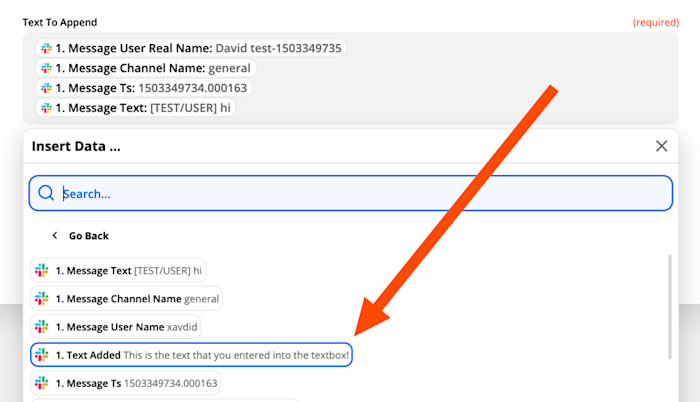
Text To Append also supports HTML, so that you can create headers, links, and even images in your new document. Feel free to customize the field however you like. Here’s mine as an example:

Test the Zap and turn it on
When the Text To Append field looks good to you, select Continue and you’ll be prompted to test the action. Testing it will send anything you added to Text To Append to the Google Doc, so you should see some sample data appear there.
![create-documentation-from-slack-messages-07-text-example A screenshot of text that our Zap put into our document, reading "This is the text that you entered into the textbox!" as a heading, and then in italics, "David test- 1503349735 said in #general: [TEST/USER] hi](https://images.ctfassets.net/lzny33ho1g45/1cZ7kpd9JrOlF5R2xJHedN/cd2261506e0ac39ab6970b7887eba6ee/af6a071a12ef4020aca0f5f30a5d3b1b.png?w=700)
Once the text shows up, you’re ready to turn on the Zap and start using it.
Bringing it all together
After you turn the Zap on, you’ll have access to a brand new Slack action that you can perform on any message: Push to Zapier. To see it, hover over any message in Slack and click on the three dots.

At the bottom of the list of options, you’ll either see “Push to Zapier” appear right away, or you can click More message shortcuts and select it from a list of shortcuts that your account has access to.
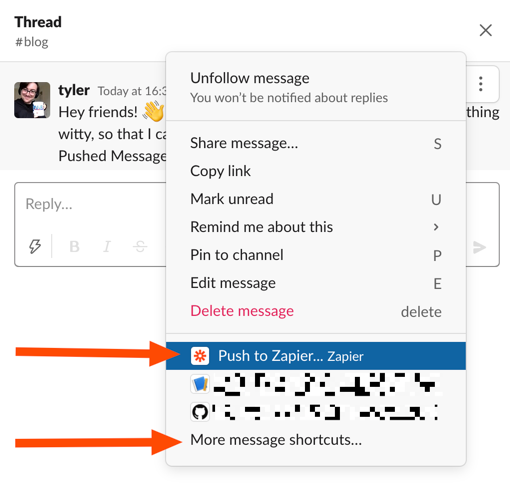
Selecting Push to Zapier will open a pop-up within Slack, which contains two fields: Zap to trigger and Additional text.
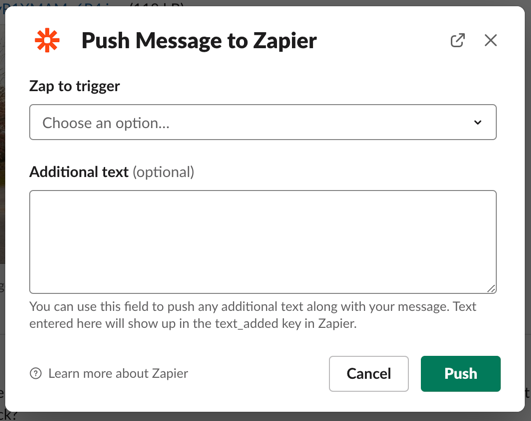
Select your Zap’s name from the Zap to trigger menu. There’s also an Additional text field, which is optional—we’ll return to that later. When you’re ready, click Push and that message will be sent to your Zap and appended to your document. Because the action appends the information, you can push multiple messages to start to build a document from the ground up, using the Additional text option to add context as you go.
Here’s a glimpse at the doc that I used to help me get started with this guide.
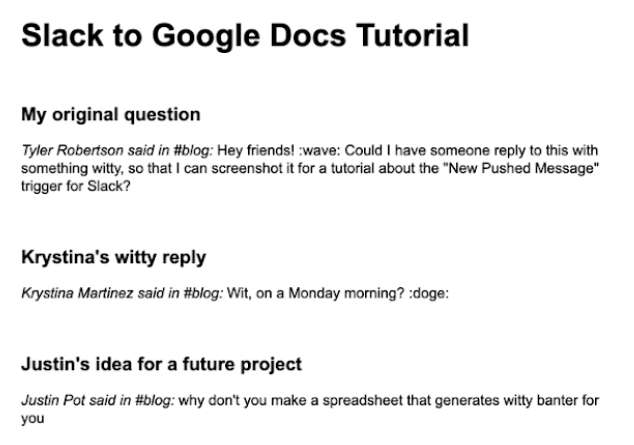
Once your document is created, you can copy it elsewhere (or automate that process as well) to share it with your team or customers. Now your frequently asked questions are already answered.
Start new documentation drafts from Slack to build a content library
That Zap always adds messages to the same document—which is great for an internal running reference doc. But what if you want to create brand new documents, and help your team quickly put together a whole library of knowledge to collaborate on?
To have your Zap create brand new documents or append to existing work, let’s replace the “Append Text” action with an action that will create something new. Google Docs has the Create Document from Text action that works perfectly for this.
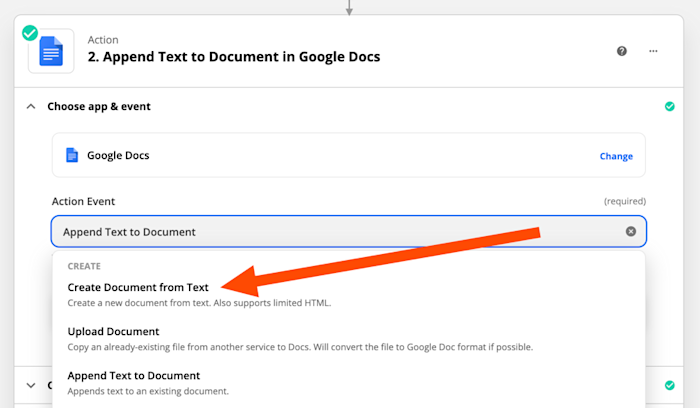
To set that action up, we’ll need to use the content from our Slack message, along with a title for the new document. Remember that Additional text field in Slack, that was optional earlier? This is when we’ll use it!
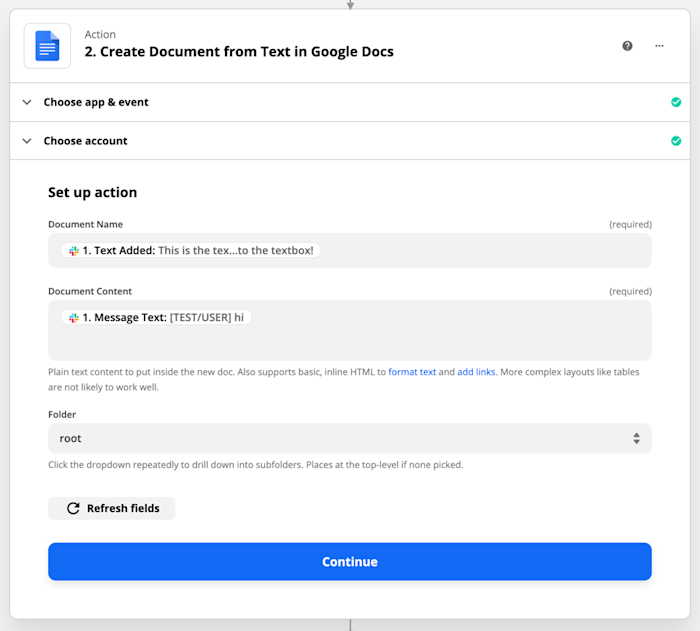
Map the Text Added value from Slack to the Document Name field. That will tell the Zap to create a document titled whatever you enter in the Additional text field in Slack. You can also use the Folder field to tell the Zap where the new document should go.
Select Continue then Test & Review, and you should see a brand new document with the sample data as its title. Now you can start editing that document, to turn something that started as a Slack thread into helpful content that will live on after the conversation has ended.
Be a documentation hero
With those Zaps up and running, you’re ready to take your team’s internal knowledge, built up over weeks or years of conversations, and quickly turn it into documentation that can be shared with new hires, project stakeholders, even customers.
Want to keep automating those daily tasks that take up your time? We’ve got you covered.
[adsanity_group align=’alignnone’ num_ads=1 num_columns=1 group_ids=’15192′]
Need Any Technology Assistance? Call Pursho @ 0731-6725516

