Want to save some time when creating your next slide deck? As a presentation design agency, we spend an embarrassing amount of time in PowerPoint. So out of our hours logged in the presentation design program giant, we want to share a way for you to work more efficiently on your PowerPoint presentations. If you’ll spend about 10-15 minutes setting up your Quick Access Toolbar in PowerPoint, you can save yourself lots of time in the long run. Trust us.
Today, we’ll show you how to set your toolbar up and will give you some tips on which quick access commands you might want to include.
How Do I Find My Quick Access Toolbar?
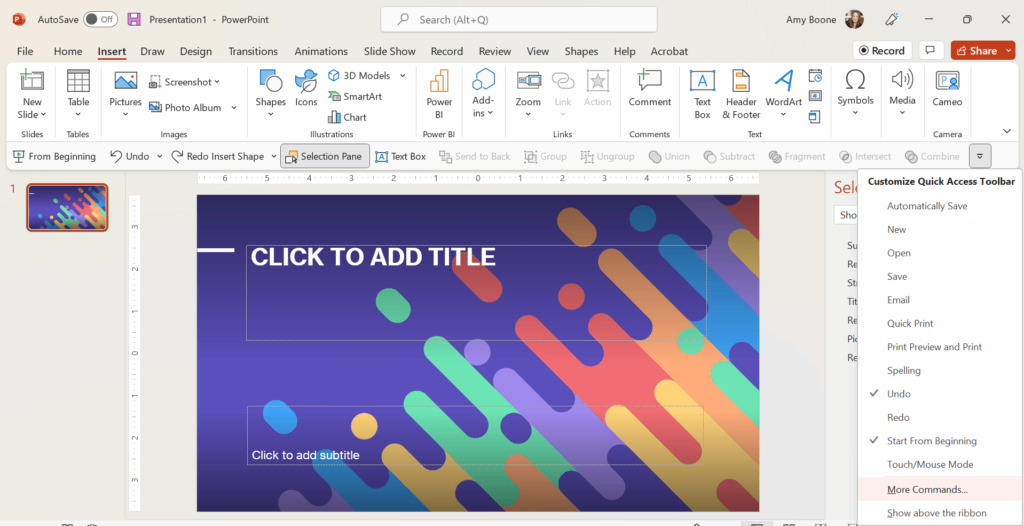
Before you can customize your Quick Access Toolbar, you have to know where to find it. In PowerPoint, look for a bar below your main menu ribbon and directly above your workspace. Click on the dropdown menu arrow on the right of that toolbar to bring up this menu. Then, select more commands.

If your quick access toolbar isn’t showing up and you don’t have an arrow to click on, go up to the search bar in the center top of your PowerPoint screen and type in “quick access toolbar.” Now, you’ll click on the choice that says options: quick access toolbar. Then, in the bottom left portion of the customize quick access toolbar menu, click to check the box next to show quick access toolbar and click OK.
 Your quick access toolbar should now show up directly above your PowerPoint workspace. Now, click on the dropdown menu arrow on the right of that toolbar to bring up your customizable menu. Then, select more commands.
How Do I Add/Remove Commands?
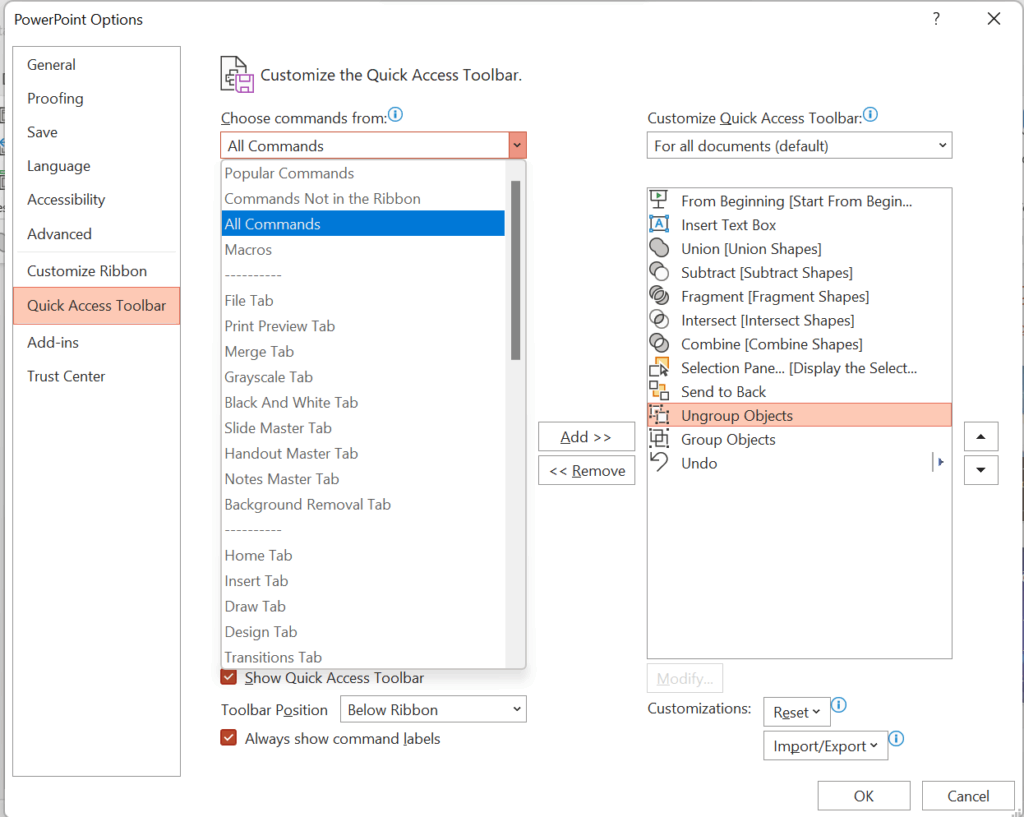
You should now be on a screen that looks like this:

From here, you are going to select the commands that you want to have quick access to from the menu on the left and add them to your toolbar which is represented by the box on the right. PowerPoint usually defaults to the Popular Commands menu. That’s fine, but if you want access to all the available options, click on the dropdown menu arrow next to Popular Commands and select All Commands.
To add a command, simply select your option from the left box by clicking on it, and then click Add. It now appears on the list on the right (your quick access toolbar list). To remove a command, click on the command in the right box that you want to remove. Then click Remove.
You can also use the arrows to the right to move the commands you’ve selected up and down on your list. This sets the order they will appear on your quick access toolbar.
Which Commands Should I Add to My Quick Access Toolbar?
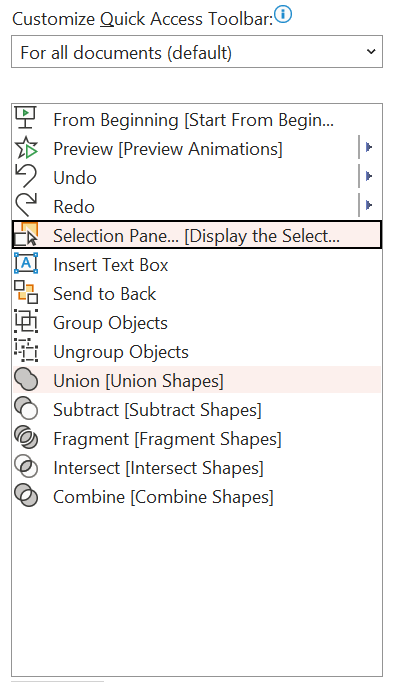
The great thing about this toolbar is that it is fully customizable. So, you can pick the commands you use the most when creating your slide decks. Here’s what my toolbar looks like:
 From Beginning: Allows me to start my slideshow quickly.
Preview: Gives me quick access to check how my animation settings look.
Undo/Redo: Allows me to quick undo or redo an action I’ve just made.
Selection Pane: Allows me to bring the selection pane up quickly to the right of my workspace to see and access all the elements on my slide.
Insert Text Box: Gives me a way to add a text box with one quick click.
Send to Back: Allows me to quickly adjust the layers/order of my elements.
Group/Ungroup Objects: Allows me to combine or separate items quickly.
Union/Subtract/Fragment/Intersect/Combine: All these commands pertain to shape commands that I use when creating more advanced shape layouts on my slides. They tend to get buried in other menus, so I like having them quickly accessible when I need them. If you don’t work much with shapes, you might not want these on your toolbar.
You can usually fit about 12-13 commands on your toolbar. Think about the actions you use most often. Also think about the ones you use from time to time that are difficult to access. Then add and arrange your commands until you find the system that works best for you.
Once you get used to your quick access commands, you might want to use the option on the toolbar dropdown menu that says Hide Command Labels. This removes all words from the toolbar, allowing you to add quite a few more commands.
Again, if you’ll take just a few minutes to customize your quick access toolbar, you’ll be able to create your PowerPoint slides more quickly from here on out.
For more tips and tricks on how to elevate your presentation design, check out our blog. Or get in touch with one of our presentation experts to find out how Ethos3 can help you take your presentation to the next level.
The post How To Set Up Your Quick Access Toolbar To Save You Time In PowerPoint appeared first on Ethos3 – A Presentation Training and Design Agency.
Looking For Powerpoint Design Agency?
Call Pursho @ 0731-6725516
Telegram Group One Must Follow :
For Startups: https://t.me/daily_business_reads
#Set #Quick #Access #Toolbar #Save #Time #PowerPoint


