I teach virtually for a local college, and like every educator ever, I have a serious problem with student no-shows for meetings.
After much reflection (i.e., me literally looking at my reflection in an empty Zoom room groaning, “Whyyy?”), I’ve found a promising solution: appointment scheduling software. While there are plenty of meeting schedulers to choose from, I’m a creature of habit and prefer to do everything in Google.
If you also like to dip one pinky toe into the unfamiliar while staying firmly planted in your comfort zone, follow along. I’ll walk through how to add and share appointment slots in your Google Calendar.
Google Calendar appointment slots vs. appointment schedules
The Google Calendar “appointment slots” feature will eventually be replaced by the new “appointment schedules”—and for good reason. Here are some key improvements offered with schedules:
-
Share a professional booking page. The appointment schedule’s booking page looks more modern than its predecessor and can be used by anyone with any email address.
-
Customize your appointment availability. This way, you can do things like add buffer time between meetings, set a maximum number of bookings each day, and limit how early (or last-minute) someone can book an appointment.
-
Get email notifications. You’ll receive a booking confirmation, and anyone who books will receive an automatic reminder email before the appointment.
Supercharge your Google Calendar with automation
It’s a little confusing, especially since you’re essentially creating appointment slots with the appointment schedules feature. But it wouldn’t be Google if the naming conventions weren’t confusing.
(Note: The appointment schedules feature is only available to Google Workspace Individual subscribers, along with work and school Google accounts.)
How to create appointment slots in Google Calendar
Here’s how to create appointment slots in Google Calendar using the appointment schedule feature.
-
With your Google Calendar open, click Create.
-
Select Appointment schedule as your event type.
-
Enter a title for your booking page. This will be visible to anyone with the link to your booking page and will appear on your calendar for schedules and booking.
-
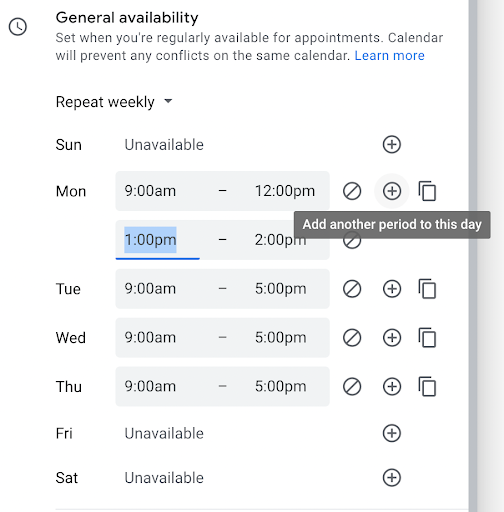
Set your General availability.
-
Set the Scheduling window. The default setting will let people book an appointment anywhere from 12 hours to 60 days in advance.
-
Select Next in the bottom-right corner of the appointment schedule.
-
Choose your meeting location or conferencing option. (Note: If you’d like to use a different video conferencing option, you need to manually update the meeting details after an appointment has been scheduled.)
-
Click Save.
A couple helpful tips:

-
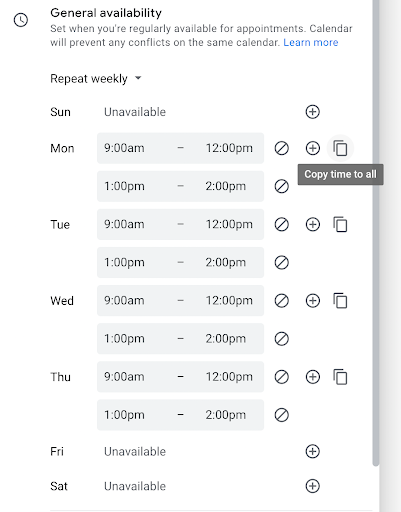
If you want to repeat the same booking windows to the rest of your available days, select the rectangular “Copy time to all” icon to the far right of the day you’d like to copy. You cannot copy one day’s availability to specific days. You can only copy it to all your available days (or not copy at all).

How to share appointment slots on Google Calendar
There are three ways to share your appointment slots. Let’s talk about the most straightforward option that appeals to my non-tech-savvy self: Share a link.
Here’s how to share appointment slots on Google Calendar:
-
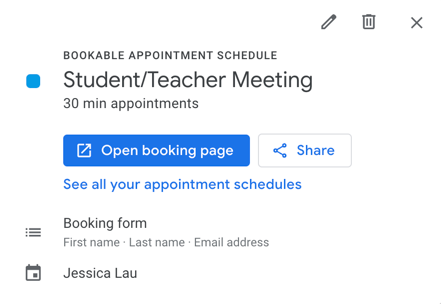
With your Google Calendar open, select the appointment schedule icon on your calendar grid.
-
To the right of “Open booking page,” click Share. If you offer different types of services and have created separate appointment schedules for each, you can share a link to all appointment schedules at once. Or, if you want to offer just one specific service, you can share a link to a single booking page.
-
Select Copy link, then Done.

If the words “embed” and “HTML” don’t scare you, there’s also the option to add an appointment schedule button or embed the booking page to your professional website. Here’s how to create that button or embed the booking page, courtesy of Google.
Hey, Google. Add Zoom.
Don’t get me wrong—Google Calendar’s new appointment schedules offers a lot of useful features that will drastically reduce the hassle of organizing a meeting. But it’s still a few automation features short of being a true Calendly alternative.
The main downside for me is the inability to add Zoom as the default conferencing option, which was originally offered with appointment slots. But who knows? Maybe Google will add it back as an option in the near future.
More Google Calendar tips for productivity:
[adsanity_group align=’alignnone’ num_ads=1 num_columns=1 group_ids=’15192′]
Need Any Technology Assistance? Call Pursho @ 0731-6725516


