If you don’t already love Asana, you might soon. The task and project management app has everything from advanced organizational features to flying unicorns, and the basic version is free for individual users. But don’t limit Asana to being only an electronic to-do list. Make Asana do more for you and your productivity by mastering these often-overlooked features.
1. Visualize Your Work in Asana’s Kanban Boards
Let’s face it, some of us just aren’t list people. We like to see an entire workflow, so we know which project each task belongs to and how the pieces all fit together—in a visual way, so those relationships are clearly laid out in front of us. That’s what Kanban boards are for, and—great news—you can get a Kanban board view in Asana.
Let’s say I wanted to manage a team. I’m the editor, and I have three team members, all writers: Ana, Leo, and Quin. I create a new project for the “Stories” board, and I add four columns, one for the stories they can each claim, and one for each writer. From there, they can all claim stories by dragging the card from the Stories column to their own, and everyone can see what’s going on.
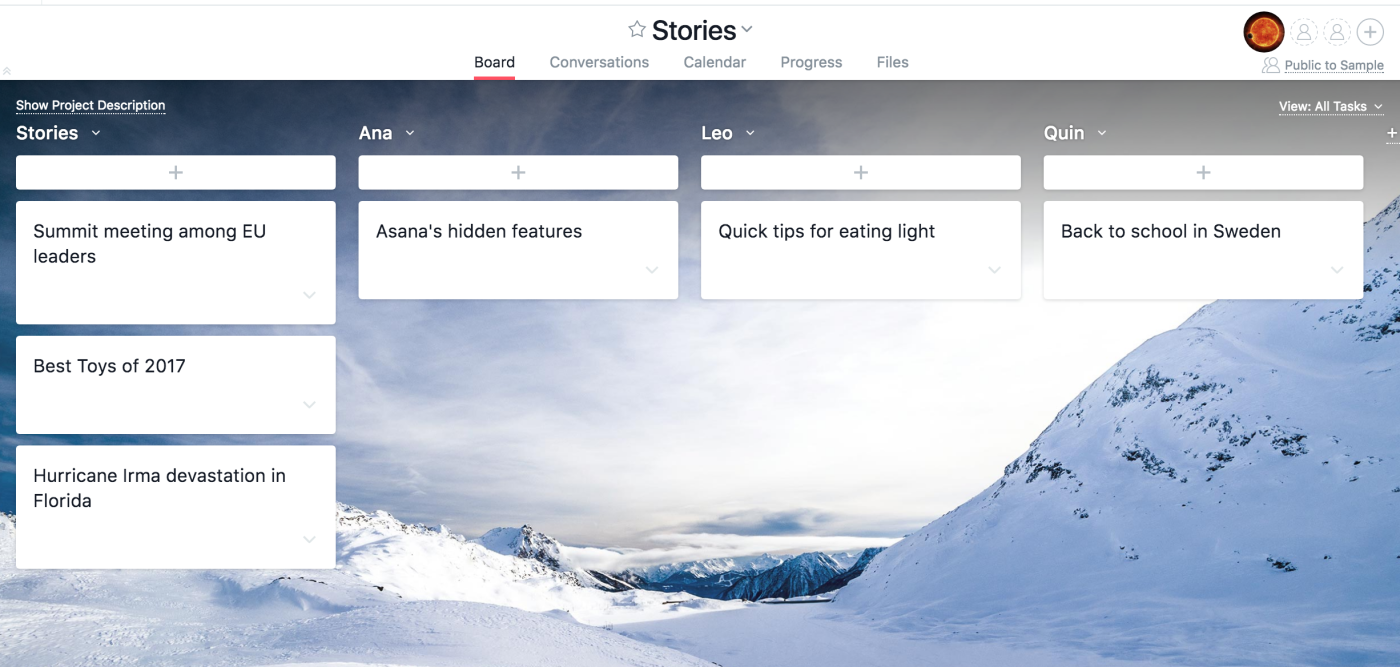
You can also manage a big, unwieldy list of “to dos” with your own boards by categorizing your tasks into “do,” “doing,” and “done” boards—a process that people like self-help guru Tony Robbins recommend. This lets you focus on what’s active right now and avoid being overwhelmed by tasks with multiple steps. You can vary this by making your categories “today,” “tomorrow,” and “later,” or whatever makes the most sense to you.
One last tip: you can also manage your contacts using the Kanban board view on Asana. Sort them into lists on the board by region, company, or perhaps type of contact.
Protip: Remember to choose the Kanban project view when you create your new board. It’s harder to change a list view to a Kanban board later.
2. Prioritize Your Tasks with Auto-Promotion in Asana
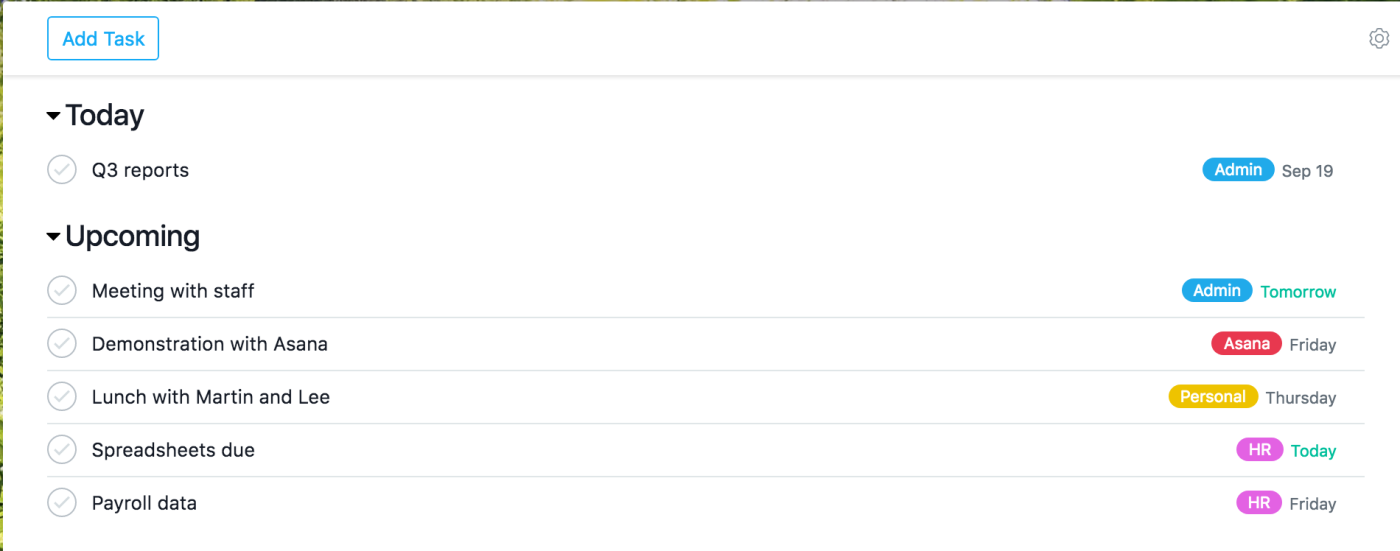
Use the auto-promotion feature in “My Tasks” to prioritize what you see in Asana and make sure you’re not overwhelmed with too many items. “My Tasks” defaults to showing you “Today” tasks, and then you can use the Upcoming (Tab + U) and Later (Tab + L) keyboard shortcuts to manage your task list and triage your day so you see only the tasks you must complete immediately. Hiding tasks that you’re not ready to tackle in “Later” helps keep things less distracting and stressful, and you won’t forget them because you can create a due date for the “Later” tasks to pop back up when it’s time.

3. Assign Tasks to Multiple Projects with Cross-indexing
Cross-indexing lets you put single tasks into multiple projects, without duplicating them, and show different display information for each user based on where it’s indexed. This means when you use cross-indexing you have a single task, cross-indexed many times in many different projects instead of multiple identical tasks in different places. Cross the task off as done in one list and it will be updated in all the other lists.
To cross-index a task, hover your mouse over the task’s name until you see a plus button. Click it and type the project name. If you’re an administrator, you’ll see a high-level project with a complete list of connected tasks and subtasks, kind of like a spider web workflow. This view also helps you make sure things within your team are moving smoothly, and if not, where the problems are so you can help.
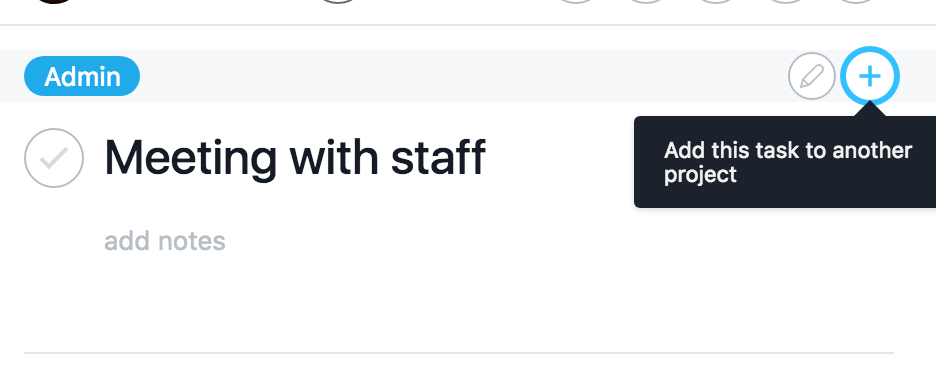
You can also cross-index subtasks:just open the subtask, click the overflow button in the upper left-hand corner, and choose “Add to Project.” The subtask will then show up in the project(s) where you placed it, but it will also still be inside its parent task. You can spider web like this pretty much endlessly in Asana.
4. Copy and Assign Tasks to Other Team Members
Wait, what if you need to duplicate a task many times? Maybe you need every team member to fill out a form or respond with comments on a document or review and approve something. In that case, because you need multiple people to do the same thing, assign copies.
Do this with a complete task you’ve created by hovering over the assignee tab and clicking on the people icon on the right. Then you select each person who gets a copy of the task. Everything except comments will be copied.
If the task is in a project, all the copies will be too, and in the same section. If it’s actually a subtask, all copies will appear in the parent task. This is a real time-saver: Instead of recreating the same task for multiple people, just create a copy for them.
5. Create Hidden Teams for Sensitive Information
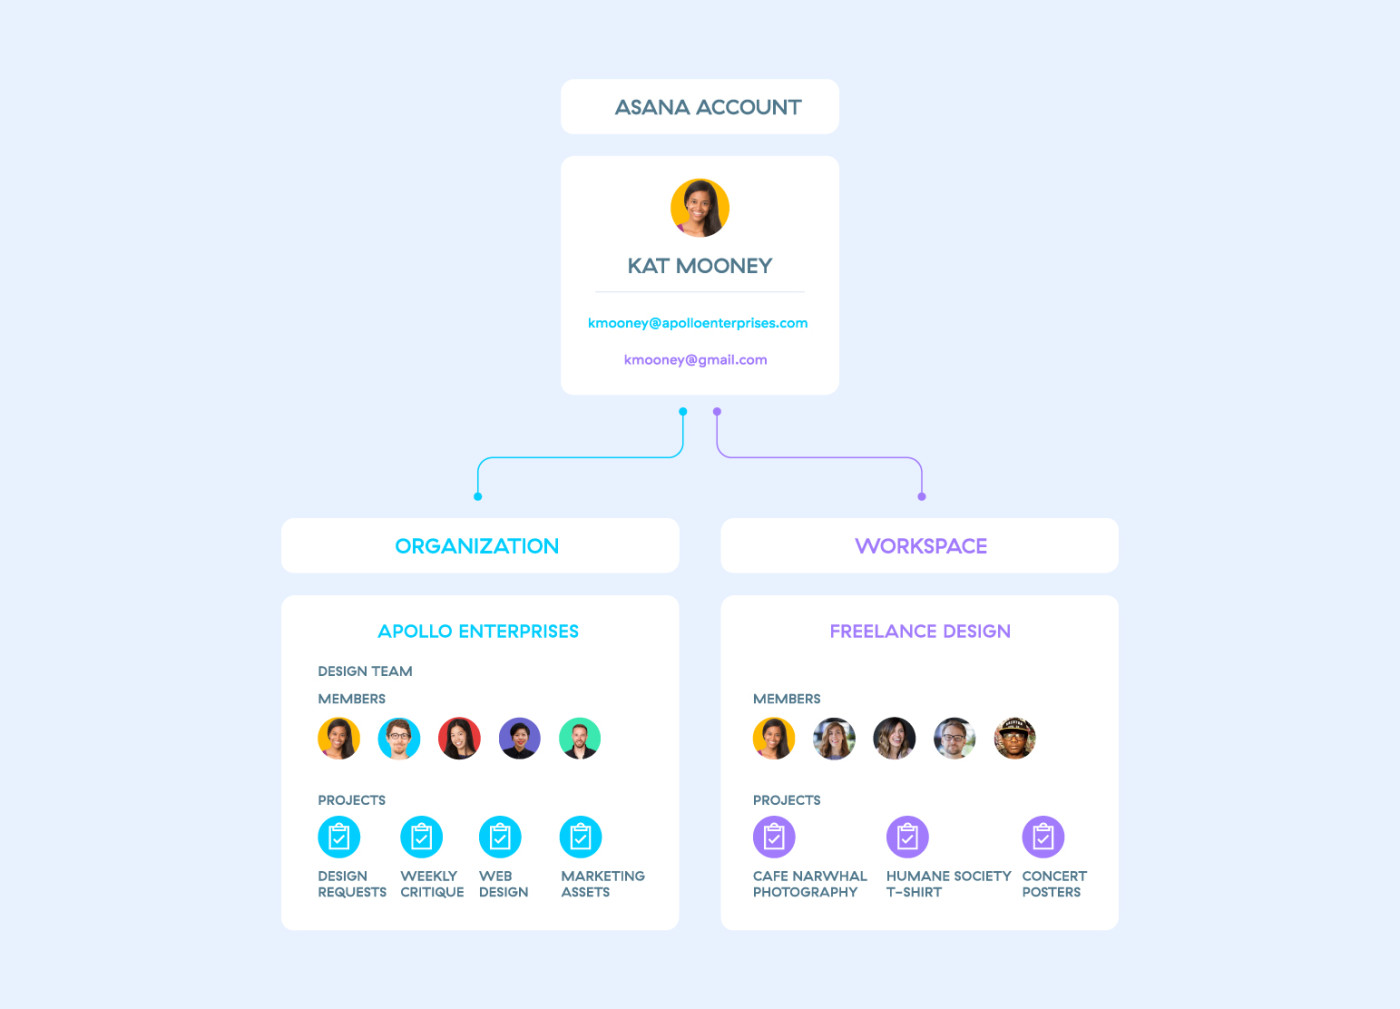
In Asana there are three kinds of teams: Public to Organization, Membership by Request, and Hidden. Public to Organization teams are accessible by team and organization members, and people can request to join them. Membership by Request teams are accessible by team members only, but people can still “see” that they exist and request to join them. Hidden teams, however, are accessible only by team members and can’t be seen by outsiders. No one can request to join them.
These are great for projects with sensitive information in them, such as financial details, intellectual property, planning the office holiday party, and other data you just don’t want getting around. To access Team Settings, go to the sidebar and hover over the team’s name. You’ll see the gear icon. Click it and select “Edit Team Settings,” and make the team “Hidden.” Remember, it’s really only hidden if it starts out that way, so think this through before you create the team.
6. Unlock Rainbow Unicorns and More in Asana’s Hacks Tab
The Hacks tab is where experimental Asana features live, so this is a magical place that you should check frequently. This is where you go to ensure you’ll get the rainbow unicorns for when you complete tasks, and the Tab+B feature, which is just like it sounds (say it out loud).
7. Turn Emails into Tasks
You can create tasks by sending emails to Asana. Here’s how Asana knows what you’re saying. An email to x@mail.asana.com creates a task in My Tasks. If you add another address in the To: field, that person becomes an assignee of that task. Anyone CC’ed on the message gets added as a follower of the task. The email subject is the name of the task, and the body is the task description. Any attachments to the email get attached to the task.
Want to go deeper? You can also send emails to create tasks within any project in Asana, because every Asana project has a unique email address. To find it, choose the project from the sidebar, click on the “project actions” dropdown arrow, and select Add Tasks by Email.
Even easier? Add a specific label to Gmail emails to use Zapier to send them to Asana automatically.
8. Set Up Recurring Tasks and Eliminate Busywork
Please, if you have a task that repeats, don’t waste your time creating it over and over again! When you create (or edit) a task, click on the due date. You’ll see the “repeat” option below the calendar, and when you click on that you can choose whether to repeat daily, weekly, or whatever, and whether you want to add a time.
If you want to repeat something daily, but only Monday through Friday, for example, choose “weekly” and then beneath that click each day, Monday through Friday. To repeat a task quarterly, choose “monthly” and select to repeat every 3 months—and every 6 months for a biannual repeat. If you want to stop the repeating, either remove the due date or click on “repeat” and choose “never.”
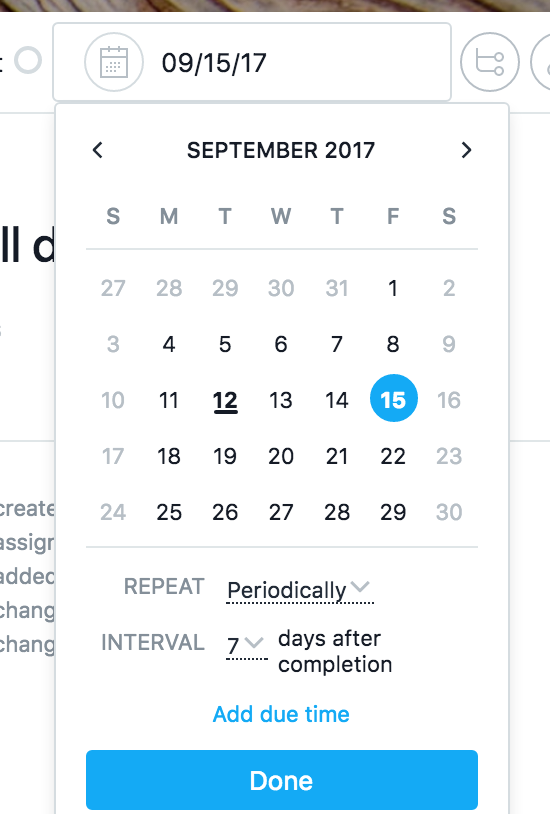
Don’t set subtasks to repeat if a parent task already does, because it will carry every subtask in it with it. If you miss your deadline, just check that task; it won’t advance to the next day’s (already missed) deadline, but to today’s.
9. Focus on Your Tasks with Inbox Snooze
If you need to power through some work, minimize distractions for an hour by using the inbox snooze feature. In the Hacks tab, select “Inbox Snooze.” This turns off messages for one hour while you what you need to do.
10. Add More Details to Tasks with Custom Fields
Custom fields let you track work and projects like a boss and give everyone the maximum amount of information in a single glance. They also add to the searchability of the project and workspace and link up your projects and people. It’s kind of like adding color-coded keywords to everything.
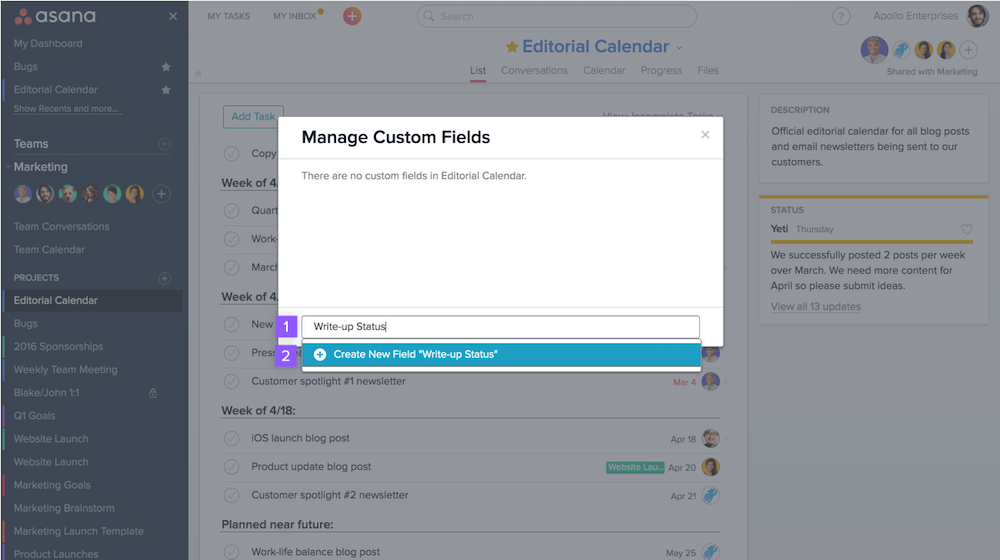
To access and manage custom fields for your project, click the “project actions” arrow in the header, and then choose “Manage Custom Fields” from the dropdown menu. From that dialog box you can see each field’s name, type, and description, edit or remove any field, and add new fields to the project. From the task pane, you can manage custom fields by clicking on the settings cog in the pane and choosing “Manage Custom Fields.”
Once you’re in the Manage Custom Fields dialog box, create a custom field and put it in your project by typing the new field’s name and then choosing the “create” option. You can edit the name, type, and description in the next window. Be careful, because once you’ve created a custom field, you can’t change its type.
You should be able to see your custom fields in two places: in your right pane’s task details, and as columns in the main pane’s task list. If something has more than one field, you should be able to see them all in the right pane details.
11. Find What You Need in Asana Fast with Advanced Search and Search Views
There are a lot of ways to search on Asana, but for now, forget regular and full text searches, and let’s just talk about advanced search and search views.
Search Views are the lists of tasks you get based on whatever search criteria you specify. You use these to find any specific group of conversations or tasks. Just click in the “Search” field at the top of the screen and you’ll see “Advanced Search” at the bottom. Once you’re there, you’ll see all of the advanced criteria. Click on “add filter” to narrow it down even more. You can sort the results based on any of the criteria. Once you’ve got your results you can refine if they’re not quite right, sort to reorder them, or click on a task to see the details.
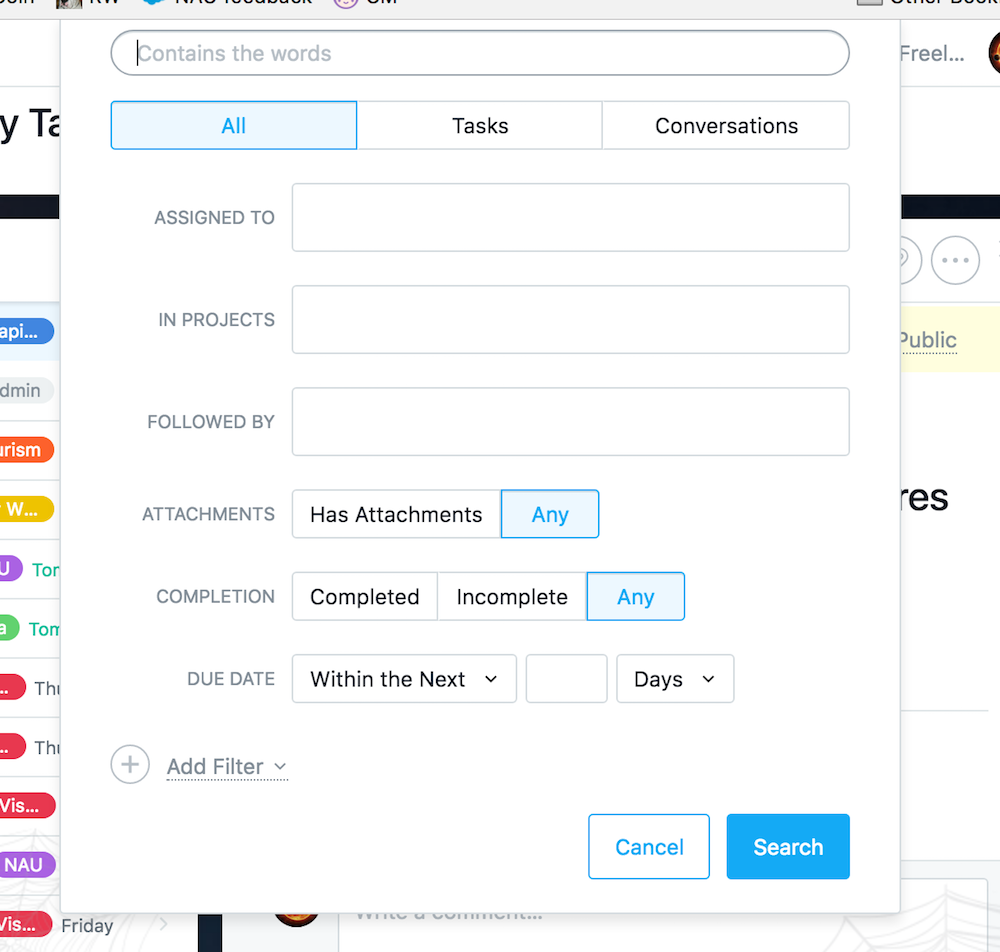
If you know there are searches you’ll be doing repeatedly, create search views for them. These are like bookmarked keyword searches that you can call up anytime, share with colleagues, and even use for reporting. Whenever you have a list of search results you want to save as a search view, just click the yellow star to the left of the search title. Once you do this, that search view will appear in the sidebar.
12. Supercharge Asana with Awesome Extensions and Integrations
Make the most of your Asana time with great extensions and integrations:
-
Chrome. The official Asana Chrome extension lets you add tasks quickly as you browse the web. The name of the page becomes the task name, with the link as a note. Add a description if you need one.
-
Paydirt. Track your time with the Paydirt extension, which records the time you spend in Asana, broken down by minutes per project. If you forget to “clock in” you can retroactively start the timer, and if you really need to keep better track of where your time is going, this is a perfect extension.
-
Front. Integrate email, Facebook, and Twitter conversations with Asana using Front Conversations can be added either as their own tasks or to provide details for existing tasks.
-
Zapier. Use Asana with the business apps you use every day—connect Asana to over 750 apps with Zapier.
There’s so much more to Asana than many users know. Remember these awesome overlooked features to get more out of Asana, and to really optimize your task and project management workflow. And when you get more done, you can reward yourself with more rainbow unicorns.
Keep Reading:
[adsanity_group align=’alignnone’ num_ads=1 num_columns=1 group_ids=’15192′]
Need Any Technology Assistance? Call Pursho @ 0731-6725516


