You’ve launched your marketing campaign, and the leads are rolling in. But there’s a problem: the contact names are in one line. Meanwhile, your CRM, email marketing tool—and just about everything else—breaks out contacts into first and last names.
Your marketing ops team is angry that they have to manually clean up the data. Or maybe you’re the marketing ops person who’s on cleanup duty. So what can you do?

Don’t beat yourself up. Automation can help. Zapier is an automation tool that enables you to reduce manual tasks between apps. You can also use a built-in feature called Formatter to automatically split text that comes in from the apps you use most—before the info hits your marketing platforms.
We’ll show you how to use a Split Text function in your Zaps—the automated workflows you create with Zapier—to split any text and avoid manual data cleanup.
This workflow requires you to use Formatter, a built-in Zapier app available to users on a paid plan or during a trial period.
Table of contents
What is Split Text in a formatter step?
Formatter is Zapier’s built-in utility tool for Zaps. When the information from an app isn’t in the format you need, a formatter step can transform it into something you can use in later Zap steps.
We’re just going to focus on one Formatter function for now—Split Text—though there’s a lot more you can do with it, like change capitalization, date formats, or remove characters.
Split Text does just what it describes. You can tell Zapier the text you want to split, how you’ll split it, and how much of that split text you wish to use. Once you’ve set it up, your formatter step will do it for you automatically every time your Zap runs.
Before you begin
We’ll assume that you’re a little familiar with how Zapier works. And if you aren’t, don’t worry: It’s free to sign up for a Zapier account. We also have a guide to help you get up to speed on Zap basics. You’ll need to be in the Zap editor for this tutorial, where you can create Zaps from scratch. You should have your Zap created to the point where you need to split text.
In this example, we need to split text from a Typeform submission. If you’re using another form app, that’s fine. Just select your form app as the trigger, and keep following along. We’re going to put our formatter step right after our trigger—the event starting our Zap.

Note: You can add a formatter step right after a trigger or an action—the event your Zap performs once it’s triggered.
How to split text with a formatter step
Click the plus sign to add a step to your Zap. Then, click on Format located on the right-hand side.

Click on the dropdown menu underneath Action Event and select Text. Click Continue.

Click on the dropdown underneath Transform, then search for and select Split Text.

Now you’ll see the settings for splitting text:
-
Input: The actual thing you want the formatter step to split.
-
Separator: The character or word separator you want the formatter step to split your text on.
-
Segment Index: After Zapier splits your text, how much of it you want back to use in later steps of your Zap.
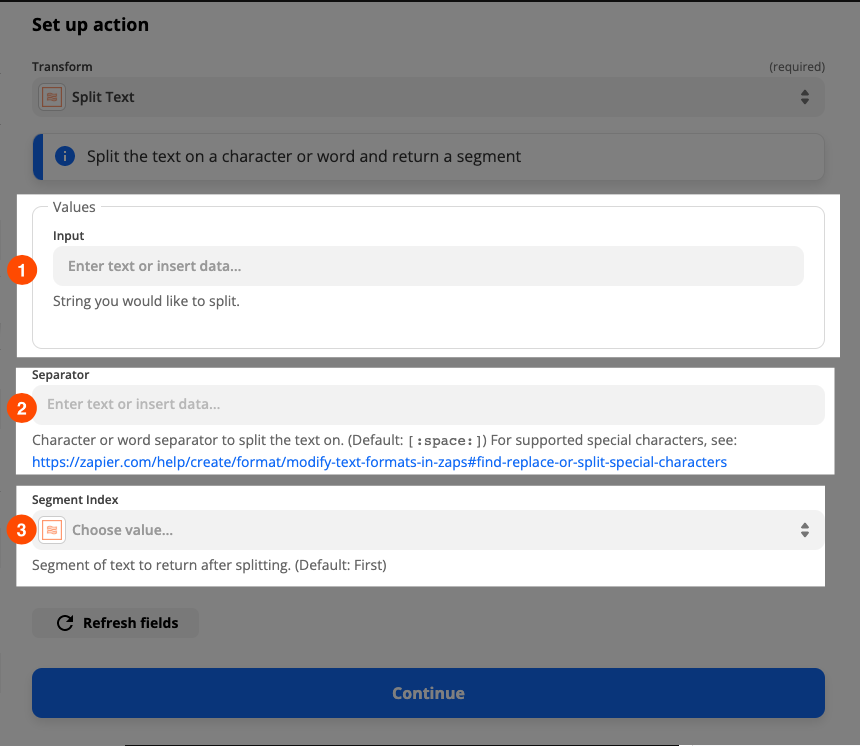
We’ll go over how to configure these settings.
Select your input
The Input field will need the text you’re telling Zapier to separate. Click inside the field. You’ll see a dropdown menu of data from previous steps in your Zap. Search for and select the item you want to split.
In this example, we want to split full names into first and last names. We’ve selected the form question where a lead would enter their name.
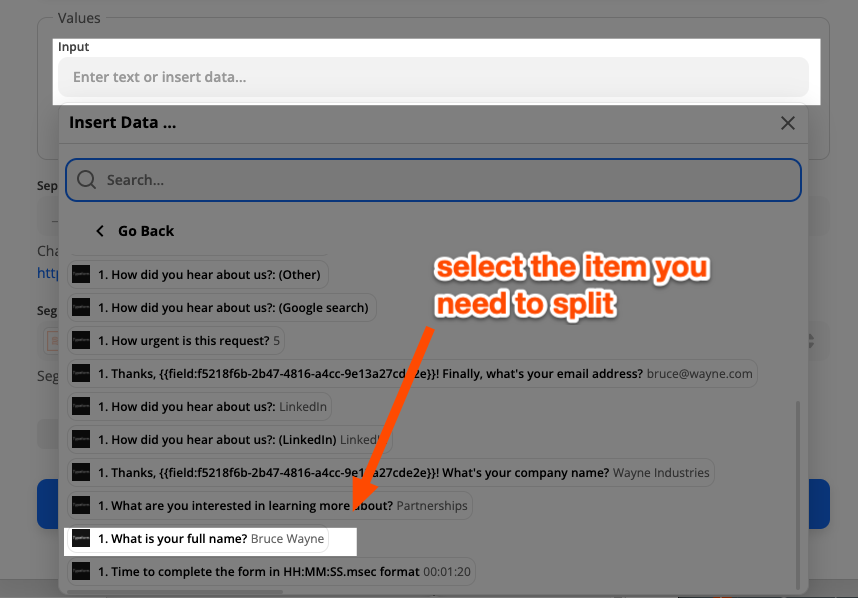
Note: Do not type in text in the Input field. You may be tempted to. However, Zapier treats typed-in text as a static value. That means that if you typed in text in the Input field—such as “Lex Luthor”—Zapier would split that exact text every time your Zap ran instead of the actual name coming through your app. Learn more about field mapping.
Pick your separator
Now you need to tell the formatter step where to split the text—this can be a word or a special character, like dashes or commas.
If you need to split a string of text based on spaces, new lines, tabs, or returns, a formatter step can do it—but hitting the spacebar won’t cut it. You need to tell the formatter step in a specific way: by putting your instructions between two square brackets and two colons. Learn more here.
Since we want the formatter step to split the full name at the space between “Bruce” and “Wayne,” we’ve typed in [:space:]. Now the formatter step understands that we want it to split text whenever there’s a space in our form response.
![Adding instructions to the Separator field Highlighted Separator field with [:space:] in the field](https://images.ctfassets.net/lzny33ho1g45/5IdYhkujnXbghuIeMY87eq/b44380a9a6a24f5b8469f2ba4a6a76da/how-to-split-text-07-separator-field.png?w=1400)
Choose which segment you want returned
Now you can decide which segments of your split text you want Zapier to return to you.
Click on the dropdown beneath Segment Index. You’ll see a list of options.
Here’s what they mean:
-
First: Zapier will return only the first segment of the split text. In our example, it would return “Bruce.”
-
Second: Zapier will only return the last segment of the split text. For example, if our lead submitted his full name—middle included—the formatter step would return “Thomas.”
-
Last: Zapier will only return the last segment of the split text. (Example: “Wayne”.)
-
Second to Last: Zapier will return only the second-to-last segment of our split text. For example, if we wanted to split an address and our lead submitted “Wayne Tower, Gotham City,” the formatter step would return “Gotham.”
-
All (as Line-items): Zapier will return our segments as a line-item array. Only use this if you’re sending this split text segment to an app with line-item support. If an app has line-item support, it’ll say so on its integration page in Zapier’s App Directory.
-
All (as Separate Fields): Zapier will return our split text, breaking each segment into separate fields. That will allow us to map our fields to different lines. In our example, “Bruce” would be its own field, as well as “Wayne,” allowing us to map it to separate First Name and Last Name fields in our CRM.
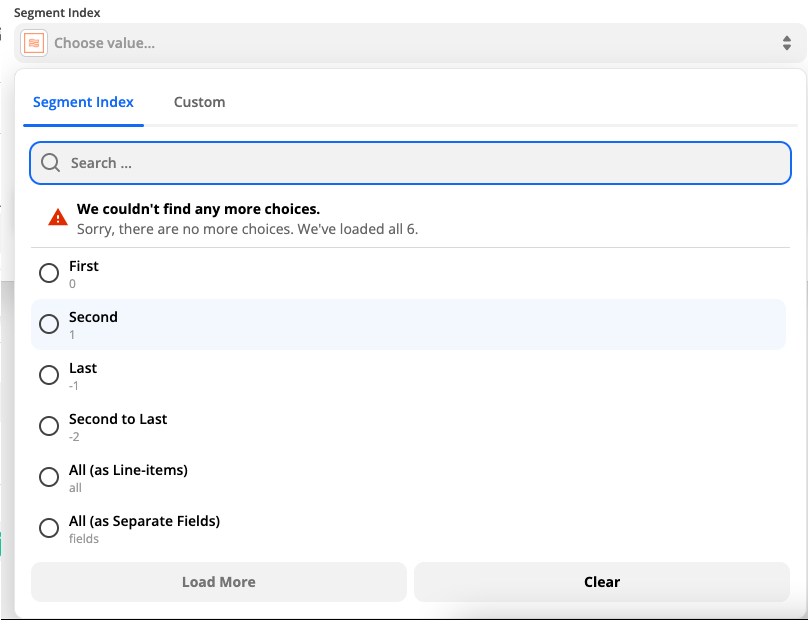
For our example, we want the formatter step to return our split text segments as All (as Separate Fields).
Once you’ve made your selection, click Continue.
Test the formatter step
Now it’s time to test our formatter step. We can check that Zapier is splitting our text how we want it.

You can skip this test if you like, but we highly recommend testing so you can preview and make any changes. You’ll use this test to finish creating your Zap.
Click on Test & Review.
You’ll see a success message and how the formatter step performed the split text. You can go back to the previous step, adjust your settings, and retest if something looks off.
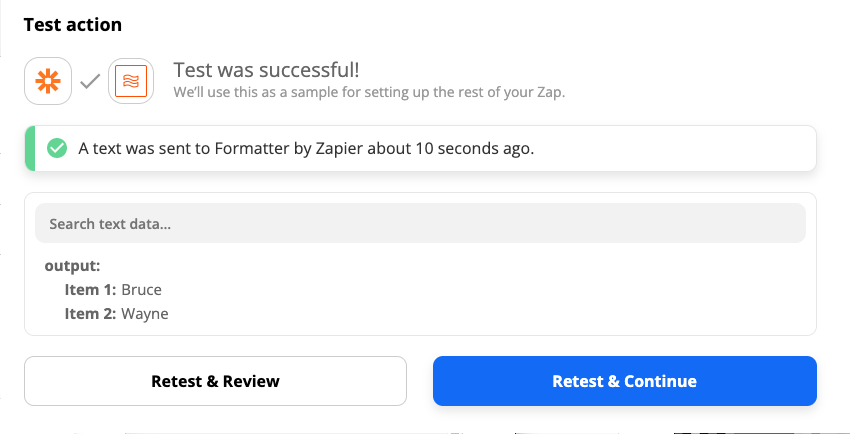
Once you’re happy with how your split text looks, click Close.
Map your newly-split text
Now you need to put that split text somewhere! Click the plus sign button to add another step to your Zap.
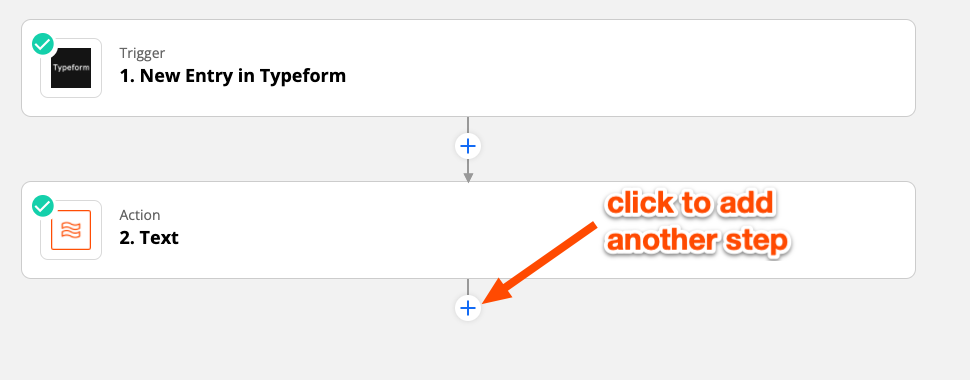
Select your action app and action event, and connect your app account.
When you’re ready to use your split text, click inside the field where you want it to go. You’ll see a dropdown menu of data from previous steps in your Zap. Click on the upside-down caret next to Text.

You’ll see the split text segments the formatter step created earlier. Click on the segments you want to map to your field.
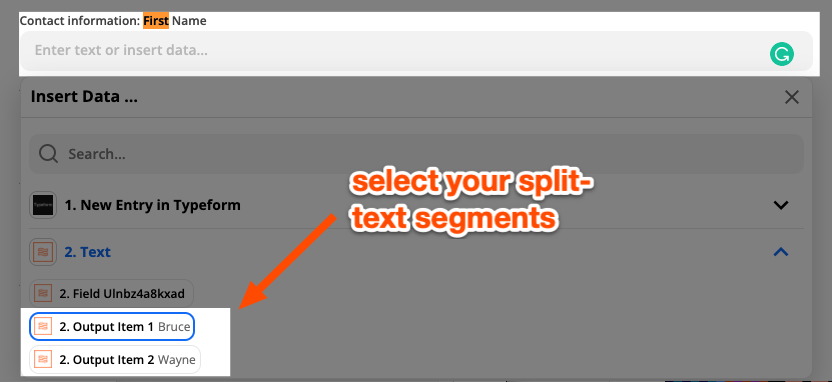
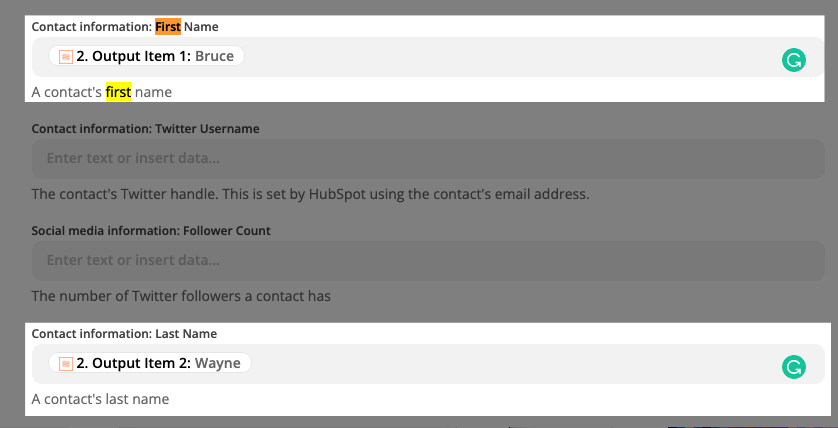
In our example, we mapped our split text segments “Bruce” and “Wayne” to the appropriate First Name and Last Name fields in our CRM.
Finish creating your Zap, test it, and don’t forget to turn it on!
Split text: Your marketing ops secret weapon
Don’t let manual data cleanup slow down your marketing efforts. With a formatter step’s Split Text function, you can automatically transform information into the format you need. Now you can focus your time on executing campaigns and reporting the results.
Looking for more data cleanup tricks? Check out our guide to Formatter by Zapier.
[adsanity_group align=’alignnone’ num_ads=1 num_columns=1 group_ids=’15192′]
Need Any Technology Assistance? Call Pursho @ 0731-6725516


