Part two of our article on “Robots.txt best practice guide + examples” talks about how to set up your newly created robots.txt file.
If you are not sure how to create your own robots.txt file or are not sure what one is, head on over to our first part of this article series, “Robots.txt best practice guide + examples” were you will be able to learn the ins and outs of what a robots.txt file is and how to properly set one up. Even if you have been in the SEO game for some time, the article offers a great refresher course.

How to add a robots.txt file to your site
A Robots.txt file is typically stored in the root of your website for it to be found. For example, if your site were https://www.mysite.com, your robots.txt file would be found here: https://www.mysite.com/robots.txt. By placing the file in the main folder or root directory of your site, you will then be able to control the crawling of all urls under the https://www.mysite.com domain.
It’s also important to know that a robots.txt is case sensitive, so be sure to name the file “robots.txt” and not something like Robots.txt, ROBOTS.TXT, robots.TXT, or any other variation with capital letters.
Why a robots.txt file is important
A Robots.txt is just a plain text file, but that “plain” text file is extremely important as it is used to let the search engines know exactly where they can and cannot go on your site. This is why it is an extremely import part of your website.
Once you have added your brand new robots.txt file to your site or are simply just making updates to your current robots.txt file, it’s important to test it out to make sure that it is working the way that you want.
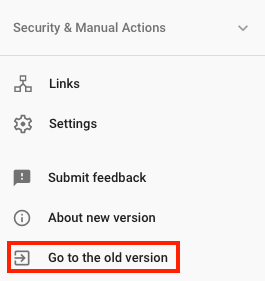
While there are lots of sites and different tools that you can use to test out your robots.txt file, you can still use Google’s robots.txt file tester in the old version of Search Console. Simply log in to your site’s Search Console, scroll down to the bottom of the page and click on → Go to old version

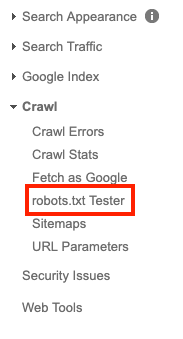
Then click on Crawl → robots.txt tester
 From here, you’ll be able to test your sites robots.txt file by adding the code from your file to the box and then clicking on the “test” button.

If all goes well, the red test button should now be green and should have switched to “Allowed”, once that happens, it means that your new created or modified robots.txt file is valid. You can now upload your robots.txt file to your sites root directory.
Google updates to robots.txt file standards effective Sept 1
Google recently announced that changes are coming to how Google understands some of the unsupported directives in your robots.txt file.
Effective September 1, Google will stop supporting unsupported and unpublished rules in the robots exclusion protocol. That means that Google will no longer support robots.txt files with the noindex directive listed within the file.
If you have used the noindex directive in your robots.txt file in the past to control crawling, there are a number of alternative options that you can use:
Noindex in robots meta tags: Both of these tags are supported in both the HTTP response headers and in HTML. However, the noindex directive is the most effective way to remove URLs from the index when crawling is allowed.
404 and 410 HTTP status codes
Both of these status codes mean that the page does not exist, which will drop any URLs that return this code from Google’s index once they’re crawled and processed.
Password protection
Adding password protection is a great way to block Google from seeing and crawling pages on your site or your site entirely (thinking about a dev version of the site) Hiding a page behind a login will generally remove it from Google’s index as they are not able to fill in the required information to move forward to see what’s behind the login. You can use the Subscription and paywalled content markup for that type of content, but that’s a whole other topic for another time.
Disallow in robots.txt
Search engines can only index pages that they know about (can find and crawl), so by blocking the page or pages from being crawled usually means its content won’t be indexed. It’s important to remember that Google may still find and index those pages, by other pages linking back to them.
Search Console Remove URL tool
The search console removal tool offers a quick and easy way for you to be able to remove a URL temporarily from Google’s search results. We say temporarily because this option is only valid for about 90 days. After that, your url can again appear in Google’s search results.
To make your removal permanent, you will need to follow the steps mentioned above
- Block access to the content (requiring a password)
- Add a noindex meta tag
- Create a 404 or 410 http status code
Conclusion
Making small tweaks can sometimes have big impacts on your sites SEO and by using a robots.txt file is one of those tweaks that can make a significant difference.
Remember that your robots.txt file must be uploaded to the root of your site and must be called “robots.txt” for it to be found. This little text file is a must have for every website and adding a robots.txt file to the root folder of your site is a very simple process
I hope this article helped you learn how to add a robots.txt file to your site, as well as the importance of having one. If you want to learn more about robots.txt files and you haven’t done so already, you can read part one of this article series “Robots.txt best practice guide + examples.”
What’s your experience creating robots.txt files?
Michael McManus is Earned Media (SEO) Practice Lead at iProspect.
Related reading
A PWA is a mobile-friendly website that behaves like an app but doesn’t need to be downloaded to be used. Starbucks’ and Forbes’ case studies included.
What is considered duplicate content? What steps can you take to make sure it doesn’t hamper your SEO efforts? Pressing SEO questions answered.
If you care about where and how you appear on search engines, Google Search Console and its updates will be of much interest to you.


